
Most of the developers facing the following problems after creating an application
- How to create a setup file to install the application.
- How to create database during installation time of the application
- How to set database credentials during installation time.
- How to keep connection string protected in app.config file for security that no one can get the database user id and password from the installed application folder.
In order to solve the above problems I am creating a
demo application using C#.Net and SQL Server, In which application connection string
will be assign during installation time and database will also be create during
installation time. Go through the tutorial steps by steps.
Steps
1:
Create a database and a simple table for this demo. Kindly follow the script.
CREATE DATABASE PracticeDB
Go
USE PracticeDB
Go
CREATE TABLE [dbo].[Student](
[RollNo] [int] PRIMARY KEY,
[Name] [varchar](100) NULL,
[Address] [varchar](200) NULL,
[Contact] [varchar](50) NULL
)
Go
Step
2: Open
Visual Studio and Create a new Windows project, Select any language C# or VB
which you prefer. I have selected C# and named the project ExperimentalInstall as
shown in the figure.

Step
3: Take
four text boxes (txtRoll,txtName,txtAddress,txtContact), four lables, 2 buttons
(btnSave,btnClear) and a DataGridView (grdStudent) and Desgin them as shown in
the give figure.

Step
4: Now
Add Application Configuration File into your project. Follow the Steps=> Right
Click on the project -> Add -> New Item -> Select “Application
Configuration File” -> Click Add. As shown in figure.

Step
5:
Add the database credential in the configuration file. Sample code for it is
give below.
<?xml version="1.0" encoding="utf-8" ?>
<configuration>
<configSections>
</configSections>
<connectionStrings>
<add name="AdminDB" connectionString="Data Source=.\SQLEXPRESS;Initial
Catalog=PracticeDB;Persist Security Info=True;User ID=sa;Password=Mother"
providerName="System.Data.SqlClient" />
</connectionStrings>
</configuration>
NOTE: you can put name of the connection string according
to your convenience. And user id, password will be as per your SQL Server
Configuration.
Step
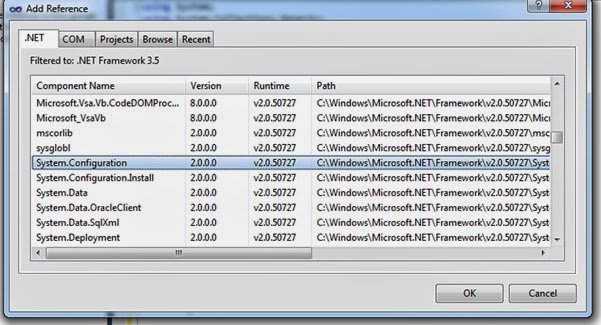
6: Now
Add System.Configuration Reference in your project. Follow the Steps=> Right
Click on your project -> Click Add References -> Select .NET Tab ->
Select System.Configuration -> OK. As shown in the figure.
Step
7:
Coding for Save and Clear buttons and to display the data in DataGridview is
given below. Figure is displaying the application is running successfully.

using System;
using System.Collections.Generic;
using System.ComponentModel;
using System.Data;
using System.Drawing;
using System.Linq;
using System.Text;
using System.Windows.Forms;
using System.Data.SqlClient;
namespace ExperimentalInstall
{
public partial class Form1 : Form
{
public Form1()
{
InitializeComponent();
}
// Here connection string is initialized with the
app.config fille in which name of the connection string is AdminDB
SqlConnection con = new
SqlConnection(System.Configuration.ConfigurationManager.ConnectionStrings["AdminDB"].ConnectionString);
SqlCommand cmd;
private void
btnSave_Click(object sender, EventArgs e)
{
if (ValidateInput())
return;
try
{
string Query = "INSERT
INTO Student(RollNo,Name,Address,Contact) VALUES ('"+txtRoll.Text+"','" + txtName.Text + "','" + txtAddress.Text + "','" + txtContactNo.Text + "')";
cmd = new SqlCommand(Query,
con);
con.Open();
if (cmd.ExecuteNonQuery() > 0)
{
MessageBox.Show("Information Saved Successfully", "Save", MessageBoxButtons.OK,
MessageBoxIcon.Information);
grdStudent.DataSource = GetData();
}
else
{
MessageBox.Show("Unable to Save Information", "Error", MessageBoxButtons.OK,
MessageBoxIcon.Warning);
}
}
catch (Exception
ex)
{
MessageBox.Show(ex.Message, "Error Description", MessageBoxButtons.OK, MessageBoxIcon.Error);
}
finally
{
if (con.State == ConnectionState.Open)
con.Close();
}
}
private void
btnClear_Click(object sender, EventArgs e)
{
txtRoll.Text = "";
txtName.Text = "";
txtAddress.Text = "";
txtContactNo.Text = "";
}
private bool
ValidateInput()
{
if (txtRoll.Text == "")
{
MessageBox.Show("Please provide the roll number", "Field is empty", MessageBoxButtons.OK, MessageBoxIcon.Exclamation);
return true;
}
if (txtName.Text == "")
{
MessageBox.Show("Please provide the name", "Field is empty", MessageBoxButtons.OK, MessageBoxIcon.Exclamation);
return true;
}
if (txtAddress.Text == "")
{
MessageBox.Show("Please provide the address", "Field is empty", MessageBoxButtons.OK, MessageBoxIcon.Exclamation);
return true;
}
if (txtContactNo.Text == "")
{
MessageBox.Show("Please provide the contact no", "Field is empty", MessageBoxButtons.OK, MessageBoxIcon.Exclamation);
return true;
}
return false;
}
private DataTable
GetData()
{
string Query = "SELECT
* FROM Student";
SqlDataAdapter da = new
SqlDataAdapter(Query, con);
DataTable Table = new
DataTable();
da.Fill(Table);
return Table;
}
private void
Form1_Load(object sender, EventArgs e)
{
grdStudent.DataSource = GetData();
}
}
}
Step
8:
Now we will Create a New form to take input for Database Credentials during
Installation Time. Up to Step 7 We have just created an application. Now we
will go for installation instruction. Add new form in your project namely “frmDBSetup”.
Follow the Steps=> Rt. Click on your project -> Add -> New Item -> “Select
Windows Form” -> put Name= frmDBSetup.cs -> Click Add. As shown in
figure.

Step
9: Design
the newly added form with 2 GroupBox (1st Box for log on the server, 2nd
Box for Authentication) , 2 RadioButtons(rdoWindow, rdoSqlServer) in 1st Group Box and four
lables & four TextBoxes (txtDataSource, txtInitialCatalog,
txtUserId,
txtPassword)
in 2nd Box, One Label at Top to Display the information “Database
Connectivity Information” and one button (btnNext) at the bottom. As shown in
the figure.

Step
10: Now
Add System.Configuration.Install Reference in your project. Follow the
Steps=> Right Click on your project -> Click Add References -> Select
.NET Tab -> Select System.Configuration.Install -> OK. As shown in the
figure.

Step
11:
Now following is the code for the form frmDBSetup
using System;
using System.Collections.Generic;
using System.ComponentModel;
using System.Data;
using System.Drawing;
using System.Linq;
using System.Text;
using System.Windows.Forms;
using System.Data.SqlClient;
using System.Configuration;
using System.Configuration.Install; //
its reference is added in step 10
namespace ExperimentalInstall
{
public partial class frmDBSetup :
Form
{
private string
_NewConnectionString;
private string
_TempConnectionString;
public frmDBSetup()
{
InitializeComponent();
}
public string
GetGeneratedConnectionString
{
get { return
_NewConnectionString; }
}
public string
GetTempConnectionString
{
get { return
_TempConnectionString; }
}
private void
frmDBSetup_Load(object sender, EventArgs e)
{
rdoWindow.Checked = true;
}
//both radio buttons are attached with this single event rdoWindow_CheckedChanged
//both radio buttons are attached with this single event rdoWindow_CheckedChanged
private void
rdoWindow_CheckedChanged(object sender, EventArgs e)
{
RadioButton rdo = (RadioButton)sender;
if (rdo.Name == "rdoWindow")
EnableWindowMode();
else
EnableSQLMode();
}
private void
EnableWindowMode()
{
txtUserId.Enabled = false;
txtPassword.Enabled = false;
txtDataSource.Text = "(local)\\SQLEXPRESS";
txtDataSource.Enabled = false;
txtInitialCatalog.Focus();
}
private void
EnableSQLMode()
{
txtDataSource.Text = "";
txtDataSource.Enabled = true;
txtUserId.Enabled = true;
txtPassword.Enabled = true;
txtDataSource.Focus();
}
private void
btnNext_Click(object sender, EventArgs e)
{
try
{
if (rdoWindow.Checked == false && rdoSqlServer.Checked == false)
{
MessageBox.Show("Please select autentication for logon to the
server", "Alert", MessageBoxButtons.OK, MessageBoxIcon.Exclamation);
return;
}
if (!ValidateInput())
return;
GenerateConnectionnString();
if (!CheckConnection())
return;
this.Close();
}
catch (Exception
ex)
{
MessageBox.Show(ex.Message, "Error while Generate database script", MessageBoxButtons.OK, MessageBoxIcon.Information);
}
}
private bool
ValidateInput()
{
if (rdoWindow.Checked == true)
{
if (txtDataSource.Text.Trim() == "")
{
MessageBox.Show("Please provide the data source.", "Field is empty", MessageBoxButtons.OK, MessageBoxIcon.Exclamation);
return false;
}
if (txtInitialCatalog.Text.Trim() == "")
{
MessageBox.Show("Please provide the database name.", "Field is empty", MessageBoxButtons.OK, MessageBoxIcon.Exclamation);
return false;
}
}
if (rdoSqlServer.Checked == true)
{
if (txtDataSource.Text.Trim() == "")
{
MessageBox.Show("Please provide the data source.", "Field is empty", MessageBoxButtons.OK, MessageBoxIcon.Exclamation);
return false;
}
if (txtInitialCatalog.Text.Trim() == "")
{
MessageBox.Show("Please provide the database name.", "Field is empty", MessageBoxButtons.OK, MessageBoxIcon.Exclamation);
return false;
}
if (txtUserId.Text.Trim() == "")
{
MessageBox.Show("Please provide the user id.", "Field is empty", MessageBoxButtons.OK, MessageBoxIcon.Exclamation);
return false;
}
if
(txtDataSource.Text.Trim() == "")
{
MessageBox.Show("Please provide the password.", "Field is empty", MessageBoxButtons.OK, MessageBoxIcon.Exclamation);
return false;
}
}
return true;
}
private void
GenerateConnectionnString()
{
string NewConnectionString = "Data
Source=" + txtDataSource.Text + ";Initial
Catalog=" + txtInitialCatalog.Text;
string TempConnectionString = "Data Source=" + txtDataSource.Text;
if (rdoWindow.Checked == true)
{
NewConnectionString += ";Integrated
Security=true";
TempConnectionString += ";Integrated
Security=true";
}
else if
(rdoSqlServer.Checked == true)
{
NewConnectionString += ";Persist
Security Info=True; User Id=" + txtUserId.Text + ";Password=" + txtPassword.Text;
TempConnectionString += ";Persist
Security Info=True; User Id=" + txtUserId.Text + ";Password=" + txtPassword.Text;
}
else
MessageBox.Show("Please select autentication for logon to the
server", "Alert", MessageBoxButtons.OK, MessageBoxIcon.Exclamation);
this._NewConnectionString = NewConnectionString;
this._TempConnectionString = TempConnectionString;
}
private bool
CheckConnection()
{
bool result = false;
try
{
SqlConnection
con = new SqlConnection(this._TempConnectionString);
con.Open();
result = true;
con.Close();
}
catch (Exception
ex)
{
MessageBox.Show(ex.Message, "Error in Connection", MessageBoxButtons.OK, MessageBoxIcon.Information);
}
return result;
}
}
}
Step
12:
Now we will add a new project (setup) in our solutions which will be our installer.
Follow the Steps=> Rt. Click on your Solution -> Add -> New Project.
As shown in figure.

Step
13:
Expend “Other Project Types” from the Left Panel and expend “Setup and
Deployment” and select “Setup Project” and put name=”Setup” then click OK. As shown
in the figure.

Step
14:
Rt. Click on Setup Project -> Add -> Primary Output -> SELECT after
pressing the Ctrl key two items (1) Primary output (2) XML Serialization
Assemblies and Click Ok. As shown in figure.

Step
15:
After Adding this primary output in your setup project you will get the
following Screen or try to get this screen.

Step
16:
Double Click on Application folder then Rt. Click on Primary output and Create
a Shortcut for it. As shown in the
figure.

Step
17:
using Step 16 I have created two shortcuts.

Step
18:
Rename the first Shorcut to ExperimentalInstall and drag it to User’s Desktop
folder in left panel and drop it there

Step
19:
We have now left one shortcut, Rename the 2nd Shorcut to ExperimentalInstall
and drag it to User’s Programs Menu folder in left panel and drop it there. Now
our application folder will have only two items. Which is primary output and
XML Serialization.

Step 20:
Now our two shortcuts having same name are in two different folders one in User’s
Desktop and other in User’s Programs Menu. Here I am showing only one folder
User’s Desktop in figure.

Step
21:
Now We will add a “Installer Class” in our first project which is ExperimentalInstall.
Follow the Steps=> Rt. Click on project ExperimentalInstall
-> Add ->
New Item -> Select “Installer Class” -> Put Name=” ConnectionStringProtector.cs”
-> Add.

Step
22:
After Adding the Installer Class you will get the following Screen.

Step
23:
Now Click on the Link “click here to switch to code view”. Then you will get
the following screen.

Step
24:
Here we will add UpdateConfigurationFile() function to save the changes
in app.config file during installation time. And we will over ride the Install()
Function to Encrypt the database Credentials in app.config file during installation time. And we will
add GetScript() function to create database and tables as it is
shown in Step 1 scripts. And we will add ExecuteScritp() Function
to execute the database script. The
Whole Code for the ConnectionStringProtector File is given Below.
using System;
using System.Collections;
using System.Collections.Generic;
using System.ComponentModel;
using System.Configuration.Install;
using System.Linq;
// Add the following Namesapaces
using System.Configuration;
using System.IO;
using System.Text.RegularExpressions;
using System.Data.SqlClient;
namespace ExperimentalInstall
{
[RunInstaller(true)]
public partial class ConnectionStringProtector
: System.Configuration.Install.Installer
{
private string
ConnctionString;
private string
TempConnection;
// Here in this constructor we will call our frmDBSetup
From for database credentials
public ConnectionStringProtector()
{
InitializeComponent();
frmDBSetup frm = new
frmDBSetup();
frm.BringToFront();
frm.ShowDialog();
if (string.IsNullOrEmpty(frm.GetGeneratedConnectionString)
|| string.IsNullOrEmpty(frm.GetTempConnectionString))
return;
ConnctionString = frm.GetGeneratedConnectionString;
TempConnection = frm.GetTempConnectionString;
}
// This function will update the connection string part in
the app.config file.
private void
UpdateConfigurationFile(string
NewConnectionString)
{
System.Configuration.Configuration c
= ConfigurationManager.OpenExeConfiguration(System.Reflection.Assembly.GetExecutingAssembly().Location);
ConnectionStringsSection section = (ConnectionStringsSection)c.GetSection("connectionStrings");
section.ConnectionStrings["AdminDB"].ConnectionString
= NewConnectionString;
c.Save();
}
public override void Install(IDictionary
stateSaver)
{
base.Install(stateSaver);
UpdateConfigurationFile(ConnctionString);//Configuring
Connection in app.config
ExecuteScript(TempConnection); // Generate
Database from the script
//Opens the specified client configuration file as a
Configuration object
System.Configuration.Configuration
config = ConfigurationManager.OpenExeConfiguration(Context.Parameters["assemblypath"]);
//Gets the source directory of the installation from the
default context parameters
// Get the connectionStrings section. Connection strings are saved under the
<connectionStrings> tag
ConfigurationSection section = config.GetSection("connectionStrings");
//Ensures that the section is not already protected
if
(!section.SectionInformation.IsProtected)
{
//Uses the Windows Data Protection API (DPAPI)
to encrypt the configuration section
//using a machine-specific secret key
section.SectionInformation.ProtectSection("DataProtectionConfigurationProvider");
config.Save();
}
}
private void
ExecuteScript(string TempConnectionString)
{
SqlConnection conn = new
SqlConnection(TempConnectionString);
//string script =
File.ReadAllText(@"C:\Users\dell\Desktop\PracticeDB.sql");
string script = GetScript(); //
Also You can execute the script from .sql file as format is given above
// split script on GO command
IEnumerable<string> cmdStrings = Regex.Split(script,
"^\\s*GO\\s*$", RegexOptions.Multiline | RegexOptions.IgnoreCase);
conn.Open();
foreach (string
cmdStr in cmdStrings)
{
if (cmdStr.Trim() != "")
new SqlCommand(cmdStr,
conn).ExecuteNonQuery();
}
conn.Close();
}
// This the script for creating database and its table. The
script is already given in Step 1
private string
GetScript()
{
return @"
USE [master]
Go
IF EXISTS(SELECT * FROM
sys.databases WHERE [name]='PracticeDB')
DROP DATABASE [PracticeDB]
CREATE DATABASE PracticeDB
Go
USE PracticeDB
Go
CREATE TABLE [dbo].[Student](
[RollNo] [int] PRIMARY KEY,
[Name] [varchar](100) NULL,
[Address] [varchar](200) NULL,
[Contact] [varchar](50) NULL
)
Go";
}
}
}
Step
25:
Now We will call the frmDBStep Form during the installation time. For doing so
we have to add “Custom Actions” in our setup project. Follow the Steps=> Rt.
Click on Setup Project -> View -> Custom Actions. You will get the following
Screen.

Step
26:
Now Rt. Click on Install folder and Add Custom Action. Then you will get the following
screen.

Step
27:
Double Click on Application Folder -> Select Primary Output -> Ok.
Finally you have added the custom Action for your installer. This will be the
screen after that.

Step
28:
Build your solution from Menu as Build -> Build Solutions and Rt. Click on
your setup project and build it seperately.
Step
29:
Now you can test your installer by Rt. Click on Setup Project -> Install. You will
get the following Screens. Just follow the installation wizard.

Another Screen Which we have created for database
Credentials i.e frmDBSetup form will be appear on the screen because we have override the Install() Function of Installer Class in Our ConnectionStringProtector File and we have added a Custom Action in our Installer (Setup Project).

Now put you database information like user id,
password and database name which was in the GetScript() function
in
Step 21.

Step 30:
Now go to your desktop you will find an icon of ExperimentalInstall. Double
Click it will work fine. As shown in the figure.

Step
31: You
can distribute the setup folder of your project for installation.

Step
32: Now
you can check the file location where you have install your application in my
case it was in “C:\Program Files (x86)\Microsoft\Setup\". Now open the
folder. You will get the following things which was installed.

Step
33: Now
open the ExperimentalInstall.exe Config File in a note pad. You will get that the
connectionString is protected that is the Connection String is in encrypted format. As shown in the figure.

Hence
we solved all the given problems for making an installer
- How to create a setup file to install the application.
- How to create database during installation time of the application
- How to set database credentials during installation time.
- How to keep connection string protected in app.config file for security that no one can get the database user id and password from the installed application folder.


